How to Partition Disks in Ubuntu
How to Partition Disks in Ubuntu: An In-Depth Guide
Partitioning disks in Ubuntu can be a daunting task if you're not familiar with Linux systems. Fear not! This article will take you through the steps needed to partition disks in Ubuntu like a pro. Whether you're a beginner or someone just looking to brush up on your skills, this guide has something for you.
What is Disk Partitioning and Why It's Important
Before we dive into the nitty-gritty, let's tackle what disk partitioning actually is and why it's important. Disk partitioning is the process of dividing a disk into separate sections that can be managed independently. This allows you to run multiple operating systems on one disk, manage data more efficiently, and even extend the life of your disk by organizing it properly.
Why You Need to Partition Your Disk in Ubuntu
- Efficiency: Partitioning can help improve system performance by logically separating system files, application files, and user data.
- Security: Isolating your OS files from your personal data can add an extra layer of security.
- Flexibility: Multiple partitions allow you to multiboot different operating systems.
Prerequisites for Disk Partitioning In Ubuntu
Before you proceed with partitioning disks in Ubuntu, make sure you have the following:
- A backup of all important files. Partitioning can sometimes lead to data loss.
- A bootable Ubuntu USB drive.
- Basic understanding of Linux command line operations.
Using GParted for Graphical Disk Partitioning
GParted is a popular graphical tool for disk partitioning in Ubuntu. Here's how to use it:
Installing GParted
-
Open Terminal (Ctrl + Alt + T).
-
Run the following commands:
sudo apt update sudo apt install gparted -
Once installed, open GParted by typing
gpartedin the terminal or search it via the Ubuntu application launcher.
Creating a New Partition
- Select the disk you want to partition from the drop-down list in the top-right corner.
- Unmount any partitions if necessary by clicking on them and selecting "Unmount".
- Click on "Device" and select "Create Partition Table" to start fresh, if needed.
- Right-click on the unallocated space and select "New".
- Choose the partition size, file system (like ext4), and other options as required.
- Click "Add" and then "Apply" in the tool menu to finalize changes.
Command-Line Disk Partitioning with fdisk
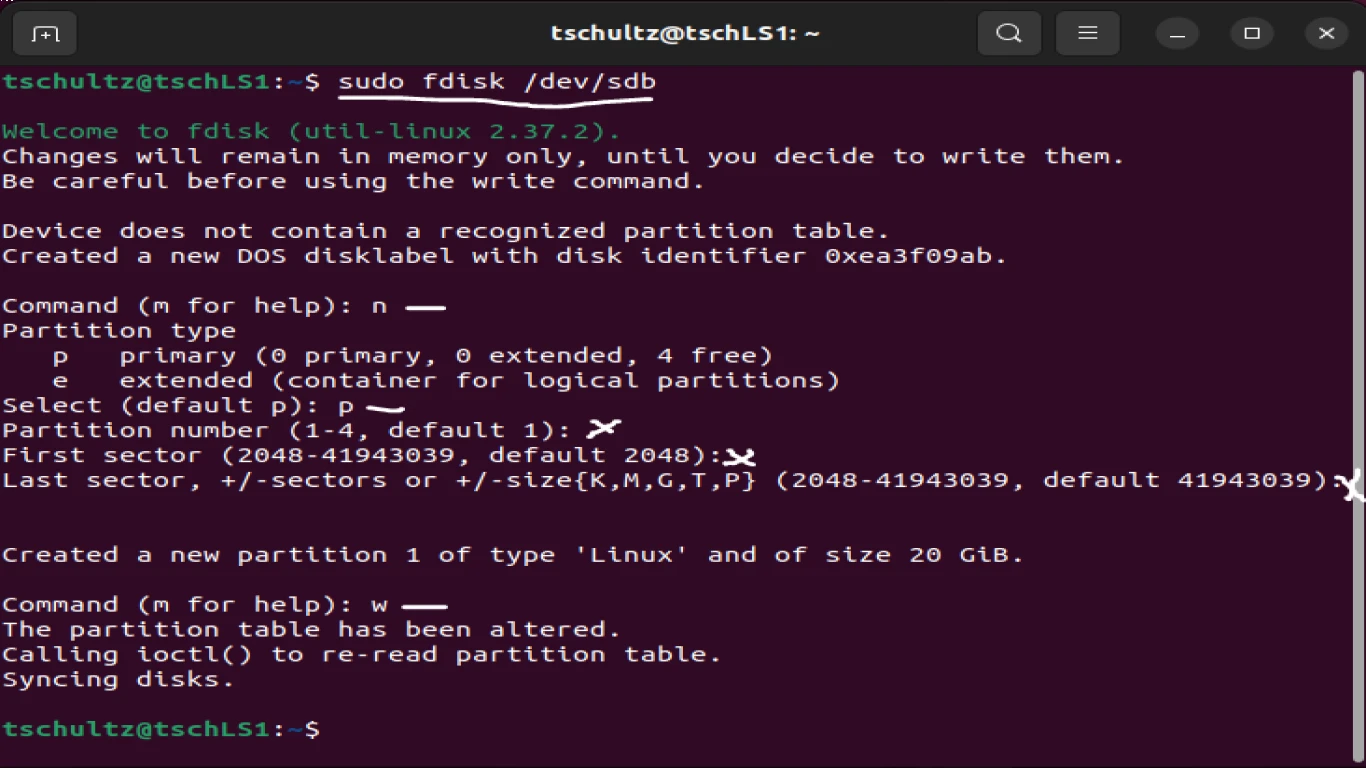
If you're more comfortable with the command line, fdisk is your go-to tool for disk partitioning in Ubuntu.
Checking Available Disks
Open the terminal and type:
sudo fdisk -lThis will list all available disks and partitions on your system.
Partitioning with fdisk
-
Run the
fdiskcommand followed by the disk you want to partition. Example:sudo fdisk /dev/sda -
Enter
nto create a new partition. -
Choose the partition type (primary, extended, or logical).
-
Define partition size or press Enter to use the default settings.
-
Press
wto write the changes to disk.
Formatting the New Partition
Format the new partition using the desired filesystem:
sudo mkfs.ext4 /dev/sda1Replace /dev/sda1 with your own partition ID.
Partition Management Using KDE Partition Manager
If GParted feels too bulky, KDE Partition Manager offers a lightweight alternative for disk partitioning in Ubuntu.
Installing KDE Partition Manager
-
Open Terminal.
-
Run:
sudo apt install partitionmanager -
Launch KDE Partition Manager from the application menu.
Using KDE Partition Manager
- The interface is somewhat similar to GParted, making it user-friendly.
- Select the disk, unmount partitions, and create or delete partitions just like GParted.
Troubleshooting Common Partitioning Issues
Error: "Device is busy"
- This error usually means the disk is in use. Ensure all partitions are unmounted.
Partitions not showing up
- Make sure the partition table is correctly written and try rebooting your system.
Corrupted Data Post-Partitioning
- Always have a backup of your data. Data corruption can result from mishandling partitions.
Conclusion
Partitioning disks in Ubuntu doesn't have to be a nerve-wracking experience. By using tools like GParted, fdisk, or KDE Partition Manager, you can efficiently manage your storage and optimize system performance. Remember to back up your data, follow the steps carefully, and you're good to go!
Frequently Asked Questions (FAQs)
1. Can I partition my disk without losing data?
Yes, using non-destructive partitioning tools like GParted can help you resize partitions without data loss. However, always back up your data before proceeding.
2. How can I resize a partition in Ubuntu?
You can resize a partition using GParted by right-clicking the partition and selecting "Resize/Move". Set the new size and apply changes.
3. What filesystem should I use for Linux partitions?
For Ubuntu, ext4 is the most common and recommended filesystem due to its performance and reliability.
4. Can I undo a partition change?
Once changes have been applied and the partition table is rewritten, reverting can be complicated. Always double-check before applying changes.
5. How do I know if my partitions are correctly set up?
You can use df -h in the terminal to view mounted partition sizes and usage to verify your setup.
#diskpartitioning #ubuntu #partitiontasks #diskmanagement #linuxpartitioning
